
0.1 Creating a project
1. The editor
2. On the right track
2.1 Quick start
2.2 The basics
2.3 The track context tabs
2.4 Flex track
2.5 Heights and slopes
2.6 Advanced track planning
3. Working the room
2.5 Heights and slopes
There are several ways to set the height for your track. You can input it, get it from the underlying terrain or enter a slope for a section so it gradualy ascends of descends. All these functions can be found in the context tab af the selected track, selection or section.

1. Manual input
Height can be put in manually using the input field with the lable 'elevation'. You can type the value or use the spinner buttons to increase or decrease the value. When typing a value, you must leave the field to set the new height. Connected tracks will be raised with the maximum slope taken into account. This way you can create a gradual slope. The maximum slope can be set on the settings tab in the left side panel.
2. Get height from terrain
3. Using the Gizmo
The Gizmo is a 3D editor tool you can switch on using this button on the projects tab. When switched on, three arrows will appear at the active handle (i.e. the track end dots). The arrows represent the axes. The green arrow represents the y-axis, that corresponds with the height. Drag this arrow to alter the height of the entire segment.
The slope editor (not yet implemented in TRAX3D)
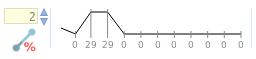
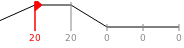
The slope editor will help you create a consistent slope for a section.
On the right you see a horizontal line representing the section, with vertical lines to mark the seperate track pieces. Before setting the slope, you need to select one of the vertical lines as a starting point.
You'll see a red arrow, pointing either left or right. Click it to change direction.
On the left you see the input box for the percentage the slope should be. Any value higher than 0 means the track will ascend, lower than 0 means it wil descend - looking in the direction of the red arrow.
To calculate the slope, click on the button below the input box: