
Scenery
Everything that stands on the ground. This is the chapter in which your layout becomes a world.
- Grass and flowers — growth you plant with the brush and that moves in the wind.
- Trees and bushes — plants you put down one at a time or spread with the spray can.
- Buildings and objects — stations, houses, sheds, and the small stuff: stones and rubble.
- Roads, fences, hedges and walls — lines you draw across the table.
- Water — lakes, seas, rivers and canals.
- Platforms — the platform along your track, ramps and all.
If the building you are looking for is not there, you draw it yourself: see the chapter WAZO objects.
They all work on the same idea: you put something down, you can click it afterwards, move it, turn it, scale it and take it away, and every action is one step in undo. And the ground under it adjusts by itself.
6.1 Grass and flowers
Growth in TRAX is not a picture on the ground but real tufts: three crossed cards with a cut-out photograph of a clump of grass on them, standing on the ground and moving in the wind.
Planting
 On the Scenery tab, open the Growth panel. That panel is only for grass and flowers; trees are sprayed from the Trees and bushes panel. The panel is the brush: open it and you can plant, close it and it stops.
- Choose Plant or Remove growth in the first list.
- Choose below it what you plant: grass, tall grass, flowers, wheat, reed or heather.
- Set the radius and the density with the sliders in the panel.
Hold the left button down and move over the ground. A patch of growth is put down for every stretch you cover. One stroke is one step in undo.
With the eraser you take away every patch whose middle comes within reach of your brush.
What grows
Kinds of growth, at the top of the panel, opens the window with the types in it. Per type you set:
- the picture — which clump it is;
- the height and width in real millimetres, so to scale;
- how hard it bends in the wind;
- how much the sizes vary, so that no two tufts are the same;
- the steepest slope it still grows on — grass does not grow on a rock face;
- whether it takes the colour of the ground.
Those measurements are real measurements. Grass in H0 is about 6 millimetres tall. That is right, and from a metre away it looks small — that is the scale.
The wind
The Settings panel has Wind strength and Wind direction. The wind holds for your whole layout and moves grass, hedges and trees together, the same way.
The swing is exaggerated on purpose. A physically correct swing of a tuft 6 millimetres tall is half a millimetre, and you cannot see that. In CAD everything stands still.
Where nothing grows
Under a road, under a platform and under a building no grass grows. TRAX sees to that itself: lay a road over it and the grass under it disappears.
Grass does not catch mouse clicks either. So you can click straight through it to select what lies underneath.
6.2 Trees and bushes
A tree in TRAX is not growth but an object: you put it down, and after that you can click it, move it, turn it, make it bigger and take it away — one at a time, each with its own step in undo.
The Trees and bushes panel
 On the Scenery tab, open the Trees and bushes panel. There are all the models with their real height, grouped by species: pine, willow, birch, palm, fern, barberry.
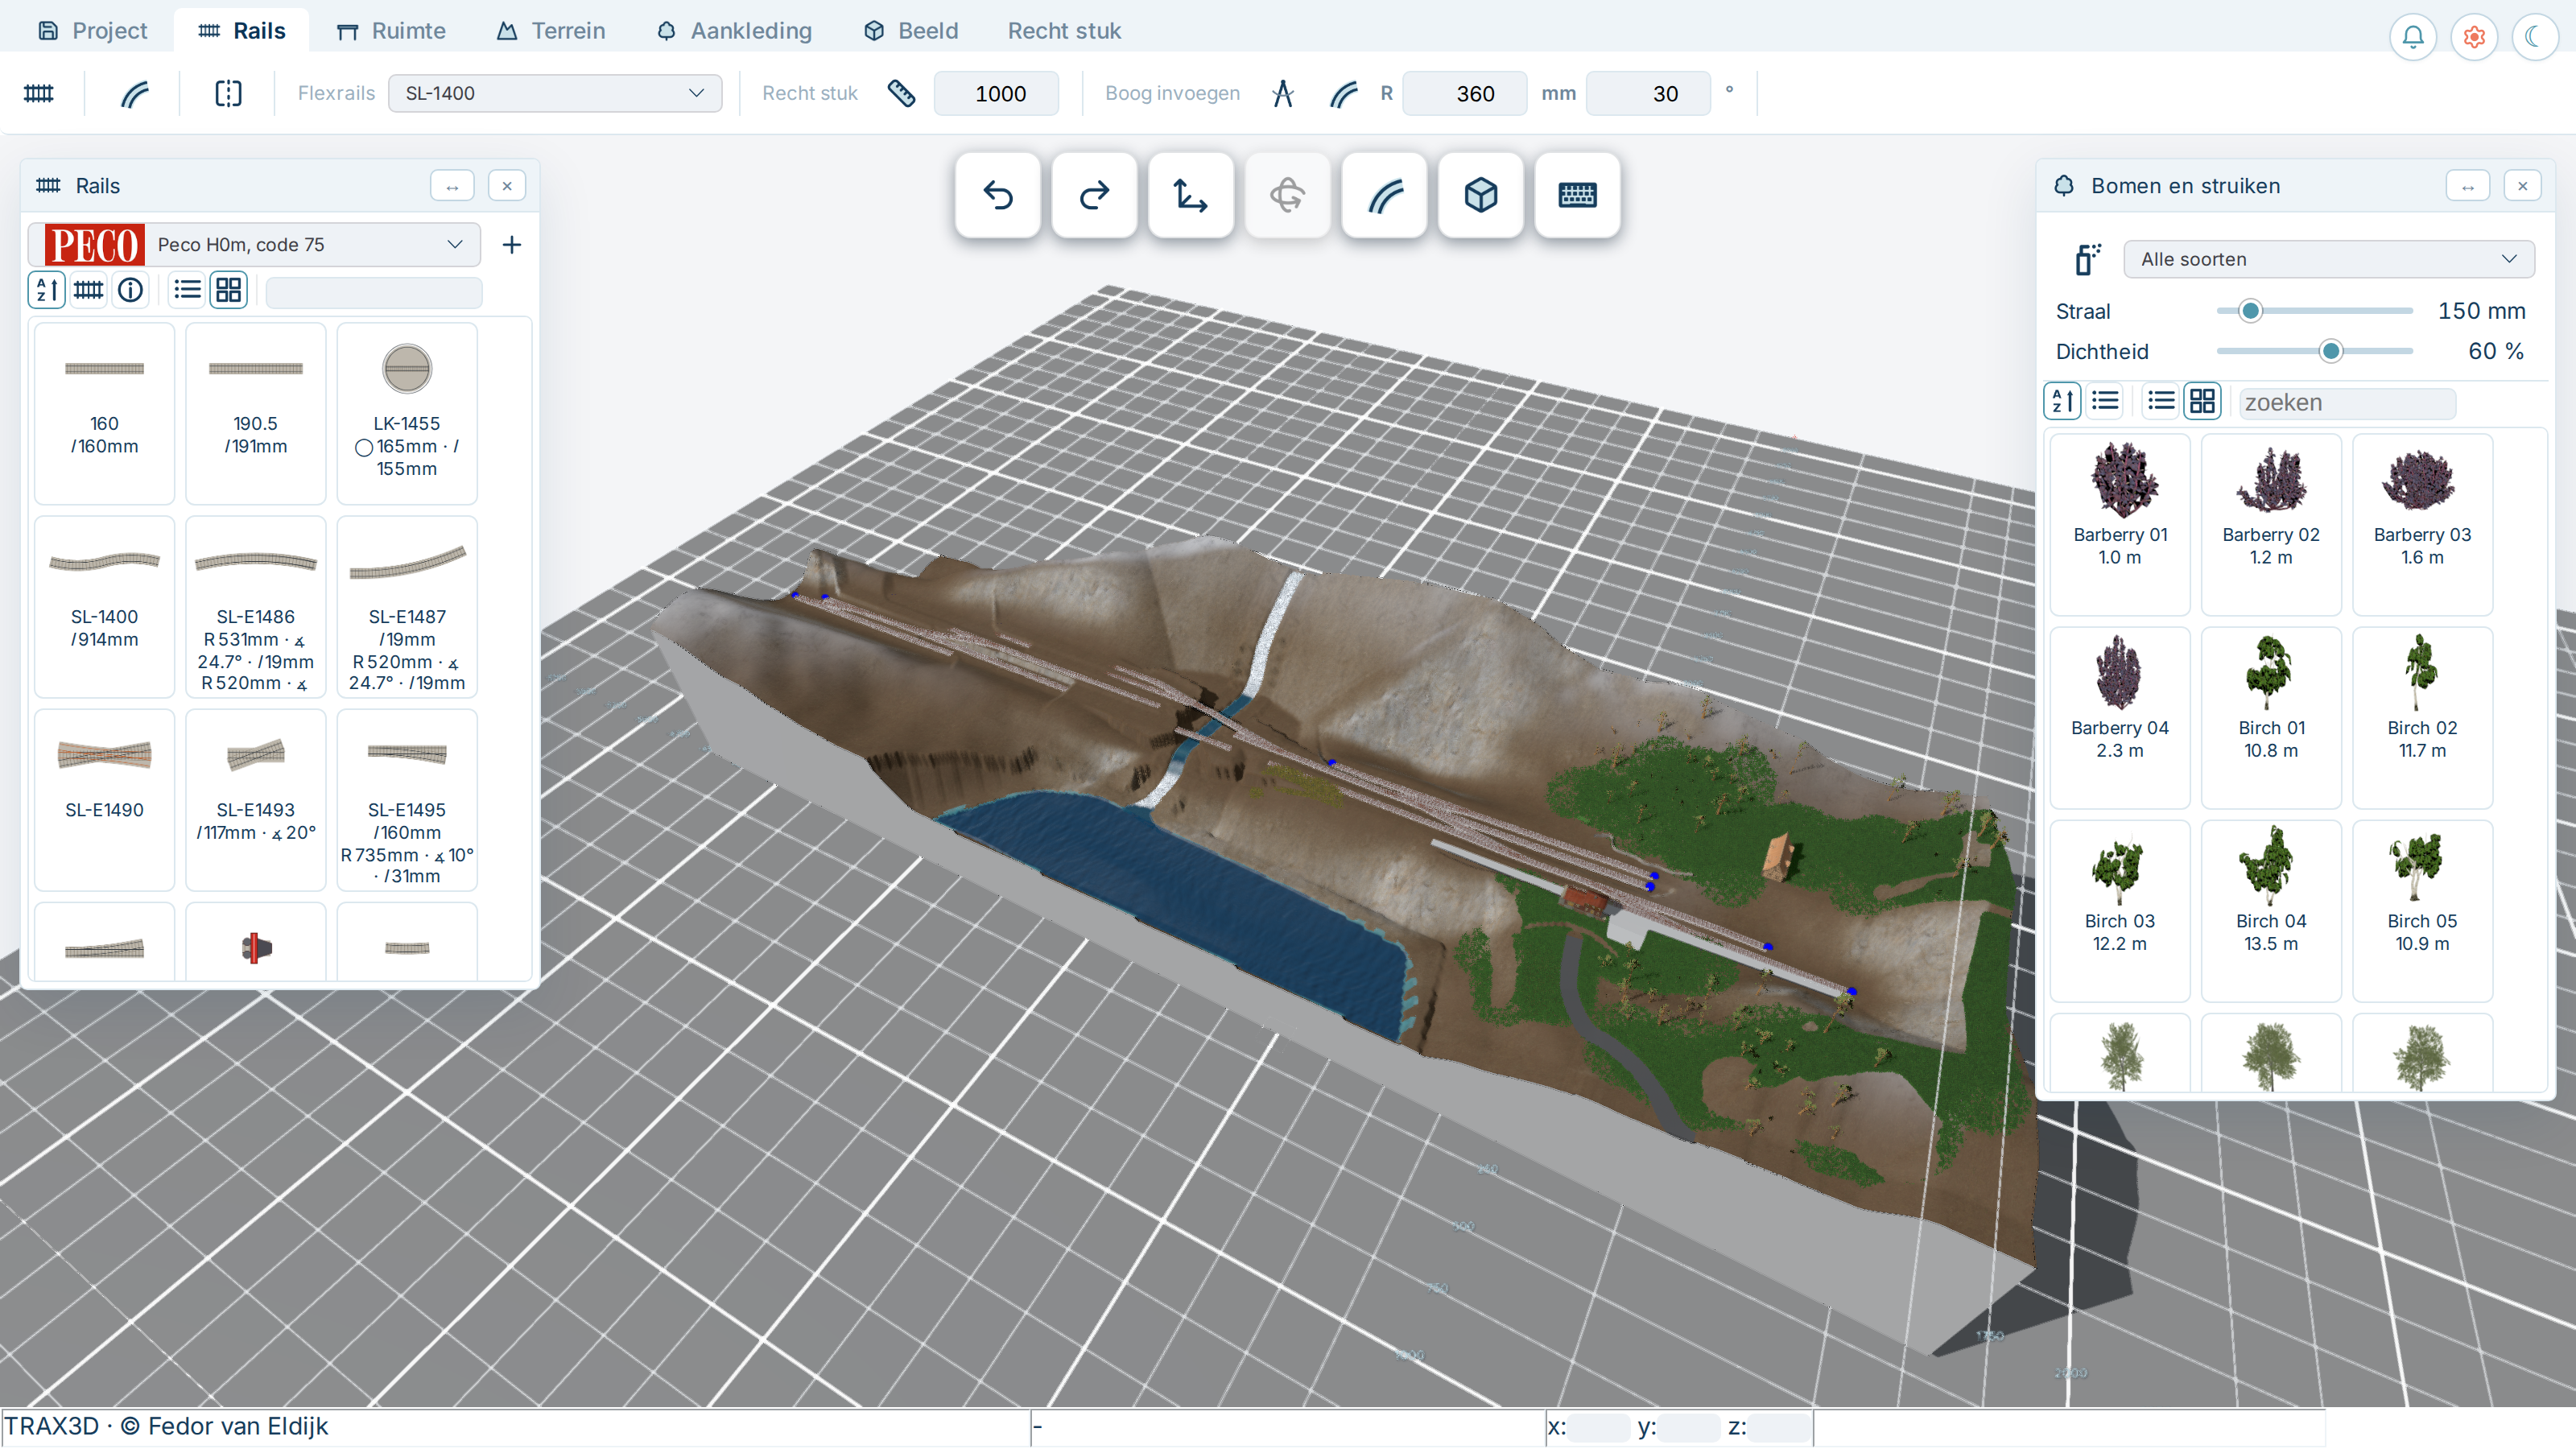
- Double-click a row to put that model down.
- Or drag the model onto the table. While you drag, a yellow box stands on the ground as big as the tree will be, so you see at once whether it fits.
Spraying
For a wood you do not put them down one at a time.
- At the top of the Trees and bushes panel, choose the species you want to spray in the dropdown, Pine for instance. The list under it then shows only that species. Choose All species and you spray all the trees and bushes mixed together.
- Switch
 the spray can on.
 - Set the radius and the density under it.
- Hold the left button down and move over the table.
The spray can stops when you click it once more, when you close the panel, or with Esc.
To spray a few particular models instead of a whole species, click those in the list, with Ctrl held for several at once. The spray can then uses exactly those.
Where TRAX does not put them
The spray can keeps its distance by itself:
- never within a third of the two heights together of another tree;
- never on the track or within the loading gauge beside it.
So a wood does not grow between the rails, and there is nothing to clear up afterwards.
Adjusting a tree
Click a tree. A yellow box appears around it and you get the Object tab:
 moving over the ground and up or down;
 turning — about its own axis, and tilting, because a fallen tree is a tree tilted through 90 degrees;
 making it bigger or smaller;
- or filling the numbers in: scale, height, heading, and the two tilt angles;
 taking it away, or Delete.
A tree always stands on the ground and follows it: sculpt a hill under it later and it goes up with it.
In CAD
In the CAD look trees are replaced by a simple shape of the right height and width: a cone for a conifer, a ball for a broadleaf, a bare trunk with a crown for a palm, a dome for a bush or a fern. That keeps the drawing readable and you still see where your wood is.
6.3 Buildings and objects
Buildings
 The Buildings panel (Scenery tab) holds the unique things: stations, houses, sheds, a viaduct, a level crossing. Those you put down one at a time — you do not spray a station.
- Double-click a row to put the building down.
- Or drag it onto the table. A yellow box stands on the ground as big as the building will be, so you see whether it fits.
Every model shows its real height. A station of ten metres is ten metres, in N as well.
A building keeps a quarter of the loading gauge from the track instead of a whole one — a station building belongs close to the rails.
When you put a building down the ground under it is levelled: a building stands on a plot, not half in a hill. Move it and the old ground comes back.
Objects
 The Objects panel holds the small stuff: stones, rubble, bricks, planks, sleepers, a tyre, a crate, a barrel, a stack of pipes.
Those you do use over and over, so you can spread them with the spray can, exactly like trees. See Trees and bushes.
A stone or a heap of rubble does not lie bolt upright: it tilts with the slope of the ground and sinks a little into it.
Adjusting a building or an object
Click it and you get the Object tab: moving, turning, scaling, or filling in the numbers. Delete or takes it away.
And if your model is not there
Draw it yourself, right in your layout: see WAZO objects. The catalogue grows too. If something you need is not in it, ask on the forum or put in a request on the donations page.
6.4 Roads, fences, hedges and walls
These are four kinds of the same thing: a line you draw across a table, with a profile swept along it. So they all work the same way and stand on the same tab.
Drawing
The Scenery tab has four buttons:  a road,
  a fence,
  a hedge and
  a wall.
- Click the button you want.
- Click the points of your line on one table. You see the line grow under your mouse.
- Hold Shift as you click to make that point a sharp corner instead of a bend.
- Double-click or press Enter to finish. Esc cancels.
The line runs as a smooth curve through your points, so you only need a few. There is no need to click a bend out.
The four kinds
- A road is a slab on the ground with a thickness, with sides running down to the ground beside it, and with a middle line if you want one: white or yellow.
- A fence is a row of posts with something between them that follows the slope. There are eight kinds: planks (three rails), a board fence (a closed wall of planks), barbed wire, chain link, a crowd barrier (loose frames of one fixed size, 1.10 m high and 2.30 m long), a steel palisade, a concrete panel fence and a wall with a railing. There is a post at each end and at every point where the line turns 45 degrees or more; between those the posts are spread evenly, never further apart than the spacing you give.
- A hedge is not a block but loose sheets of foliage around a dark core, in different sizes and directions. The less it is clipped, the further they may stand out of the block and the more the sizes vary. They move in the wind.
- A wall is a block with a width and a height, which sinks a little into the ground and follows it. On an open line the ends are closed off.
The Line tab
Click a line and you get the Line tab, with what belongs to that kind:
- Width and height in real millimetres;
- the spacing of the posts of a fence;
- the kind of a fence; the height and the post spacing jump to what suits that kind, and a board fence or a concrete panel fence gets its own texture (which you can then change);
- the middle line of a road;
- the density and the clipping of a hedge;
 the texture;
 editing the shape;
 making the selected points a sharp corner instead of a bend;
 the hedgehog: it does nothing. It is a note to be careful around the hedge — we would not want to disturb a sleeping hedgehog;
- taking the line away.
Editing the shape
Just like a table: a handle appears at every point.
- Drag a handle to move that point.
- Click beside a side to select it; a blue arrow appears, and dragging slides the whole side sideways.
- Hold Ctrl while you drag that arrow and the side is extruded: a new stretch is added. That is how you make a side road or a bulge.
- Double-click a side to add a point to it, a point to remove it.
A retaining wall
 The Line tab has a Retaining wall switch. Turn it on and a This side label appears on each side of the middle of the line: click the one on the side that is to lie high.
A retaining wall is not simply a wall standing on a slope — TRAX really cuts the ground along it. The high side is filled to the top of the wall and the low side lowered to its foot, with a truly vertical face exactly inside the wall. That gives you a retaining wall that looks like one, and not a little wall on an embankment.
What the ground does
A road and a wall make a step in the ground, not a slope: just under the road the ground is brought to its level, and beside it, within a cell and a half of the grid, it runs out into the land as it was. So the landscape beside them keeps its shape.
A road also gets a height profile of its own: TRAX reads the ground along the line, smooths it and limits it to a grade of 12 per cent. So a road does not creep up a mountain but gets a cutting and an embankment, exactly like track.
6.5 Water
Lakes, seas, rivers and canals. They are four kinds of the same thing, and you draw them on the Terrain tab, in the Water group.
Drawing
There are two ways, depending on what you are making.
A body of water —  a lake or a sea — you draw by clicking the bank. Click the points around the water, double-click or press Enter to close it.
The level lands at the lowest ground along the bank. That way the water lies in a basin and every shore is above it. If there is a hill inside your outline that stands higher, it simply stays a hill; the water does not run over it.
A running water —  a river or
  a canal — you draw by clicking its course. TRAX makes a band of it as wide as you set, and the surface follows the ground under it downhill. A river never runs uphill.
The Water tab
Click the water and you get the Water tab:
- Kind — lake, sea, river or canal. The kind decides the colour and the swell; those are the same for every water of one kind, so that a river beside a lake does not look like another substance.
- Level — the water level in millimetres. Every point shifts with it, so a river keeps its fall.
- Depth — how deep the water is. The bed is dug to that.
- Width — for a running water.
 Current — how fast it flows, with the button beside it to reverse the direction.
- Swell — how high the waves are.
- Walls — walls along both banks, as a canal has.
- Bank protection — per stretch of bank: stone, rustic, brick, concrete, sheet piling, timber piling or riprap. And the width of the coping.
- Edit the shape and take it away.
What the water does to the ground
Water digs its own bed and lays its own bank, but with two limits that matter:
- The bed cuts at most twice the depth into the ground. Without that limit a lake drawn across a hill takes the whole hill away.
- The bank is only tidied where it lies near the water. Ground lower than the water is raised to the level, like a small dike blending out at 1 in 2.5. Ground standing up to twice the depth above it is laid neatly down to the water. A rock face or a hillside standing much higher is left alone.
On a canal with walls TRAX really cuts the ground along the wall, so that the quay meets it exactly and the ground behind it runs to the land with a kerb and a slope.
If the water looks too shallow
If you have an old layout in which the water seems to lie in flat patches: TRAX digs the bed out once more when you open it, if it sees that it no longer fits the bank. That happens by itself and you need do nothing.
Drag a water away or delete it and the ground comes back the way it was — within the same session, to the millimetre. If you have re-opened the layout in between, the bed stays as it is; it does not travel in the file.
6.6 Platforms
A platform is a polygon on a table, with a deck lying at the height of your choice above the rails.
A platform along the track
- Select the pieces the platform is to lie along. Double-click a piece to take the whole run.
- Go to the Scenery tab and click
 Platform along the track.
 - Two This side labels stand beside the track: click the one on the side where the platform is to go (the label you chose is green). In the small window you choose the width and the height.
TRAX follows the centreline of every piece, sets the platform 1650 millimetres from the track's centre — the measurement NEM and UIC prescribe — and lays the deck at the rail height plus the height you gave, 550 millimetres by default. If your track runs on a grade, the platform runs with it.
The Platform tab
 Deck — the texture of the top surface.
- Edge — a white or yellow safety line 600 millimetres in from the edge, or coping stones.
- Height above the rails — moves the deck up or down.
- Edit the shape.
 Ramp — turns the selected side into a ramp down to the ground, as long as the figure beside it.
- Take it away.
Editing the shape
Exactly as with a table: a handle on every corner, dragging to move, clicking beside a side to select it and slide it sideways with the blue arrow, double-clicking a side to make a corner in it and a corner to remove it.
Hold Ctrl while dragging the arrow to extrude a side: that is how a platform gets a nose or a bay.
Ramps
A platform without a way onto it is a platform nobody reaches. Select the side where the ramp is to be and switch on. From a crease at the given distance from that side the deck falls away to the ground.
Split a side that is a ramp and both halves are ramps. Remove a corner between two sides of which one was a ramp and the merged side is a ramp too.
The platform follows its track
Set the track higher or lower later and the platform comes along: the height of every corner on the track side is read off the railhead again. And the ground comes up to the platform's foot, so that no gap is left under it.